Monday, 30 November 2015

About the Author - Print room day 2

I tried coming back into the print room with an open clear mind. I was pretty annoyed after the last printing session so I tried to look at it positively to 'how can I learn from this?'. So I chose to print the middle design because it wasn't close to the edges like the other two, so I thought it'll be an easier one to start with.

Mistake 3 - DON'T RUSH YOUR WORK!!!

Not really sure what's wrong me. I had told myself to be calm and take my time as there really isn't any rush but of course, that would be far too easy! So yes, I wasted yet more money on paper and binder on my pretty wonky, slightly patchy prints. And, naturally, my worst prints were on my £2 per sheet Fabriano paper and my best looking ones on cheap Illustration room paper. BRILLIANT

Oh yes, also when I went to retrieve my other screen to print my second layer someone very kindly had stripped my screen. Three days before it was even expired. That was very clearly labeled. So I had to re-expose my screen. So that lost me about 1 hour 30.


Friday, 27 November 2015

About the Author - Print room day 1

I was so excited when it came to printing my designs. I had exposed my screens the day before with a little help from the technicians and managed to expose my screens correctly! I couldn't wait to see how my prints were going to turn out so I got stuck in.

Mistake 1 - Don't put twice as much paint into the binder because it doesn't go through the screen.


So the first time I printed I put way too much paint into the binder so when I printed it was very very patchy and just terrible. But at least I knew where I was going wrong so I could resolve the problem and try again in the afternoon, deep breath don't panic I have time for mistakes.

Mistake 2 - Actually use the kodatrace properly so the prints are lined up accurately.


This time I think I was just rushing way too much which is stupid considering the amount of time that I have to do these prints in. I wasn't lining up the base colour print with the second layer so they were a bit all over the place. So I had wasted a day of printing and money on paper and binder... but at least I can learn from this.. right?


Wednesday, 25 November 2015

About the Author - Design 3

I honestly had no idea what to do for my final print. I didn't have a third subject that I knew just as well as the previous two designs, so I felt a but stuck. But after talking to others that knew about Douglas Adams, they recommended I should look at one of the books that Adam's co wrote - The meaning of liff. Because it's more like a dictionary rather than a story book, this meant that I didn't have to spend loads of time reading it, which is the reason why I was put off choosing another book of his. I could just skim through and pick out definitions that I liked. I also think this would be amazing to visualise, as I haven't found anyone who has put illustrations to match these definitions.

So I researched about the book itself
> Always stamped with 'THIS BOOK WILL CHANGE YOUR LIFE' - taken from the mormons (assuming as a fuck you joke to religion)
> Co-wrote by John Lloyd
> Dictionary of things that haven't got words for yet
> Toponyms
> The idea came from an old school game and started when he and Lloyd were on holiday together in Corfu
> Released in 1983
> Words taken from place names in the UK

And started reading, picking out certain words and did some quick sketches. I found the book totally hilarious so I kept forgetting that I actually had to stop and draw the words!


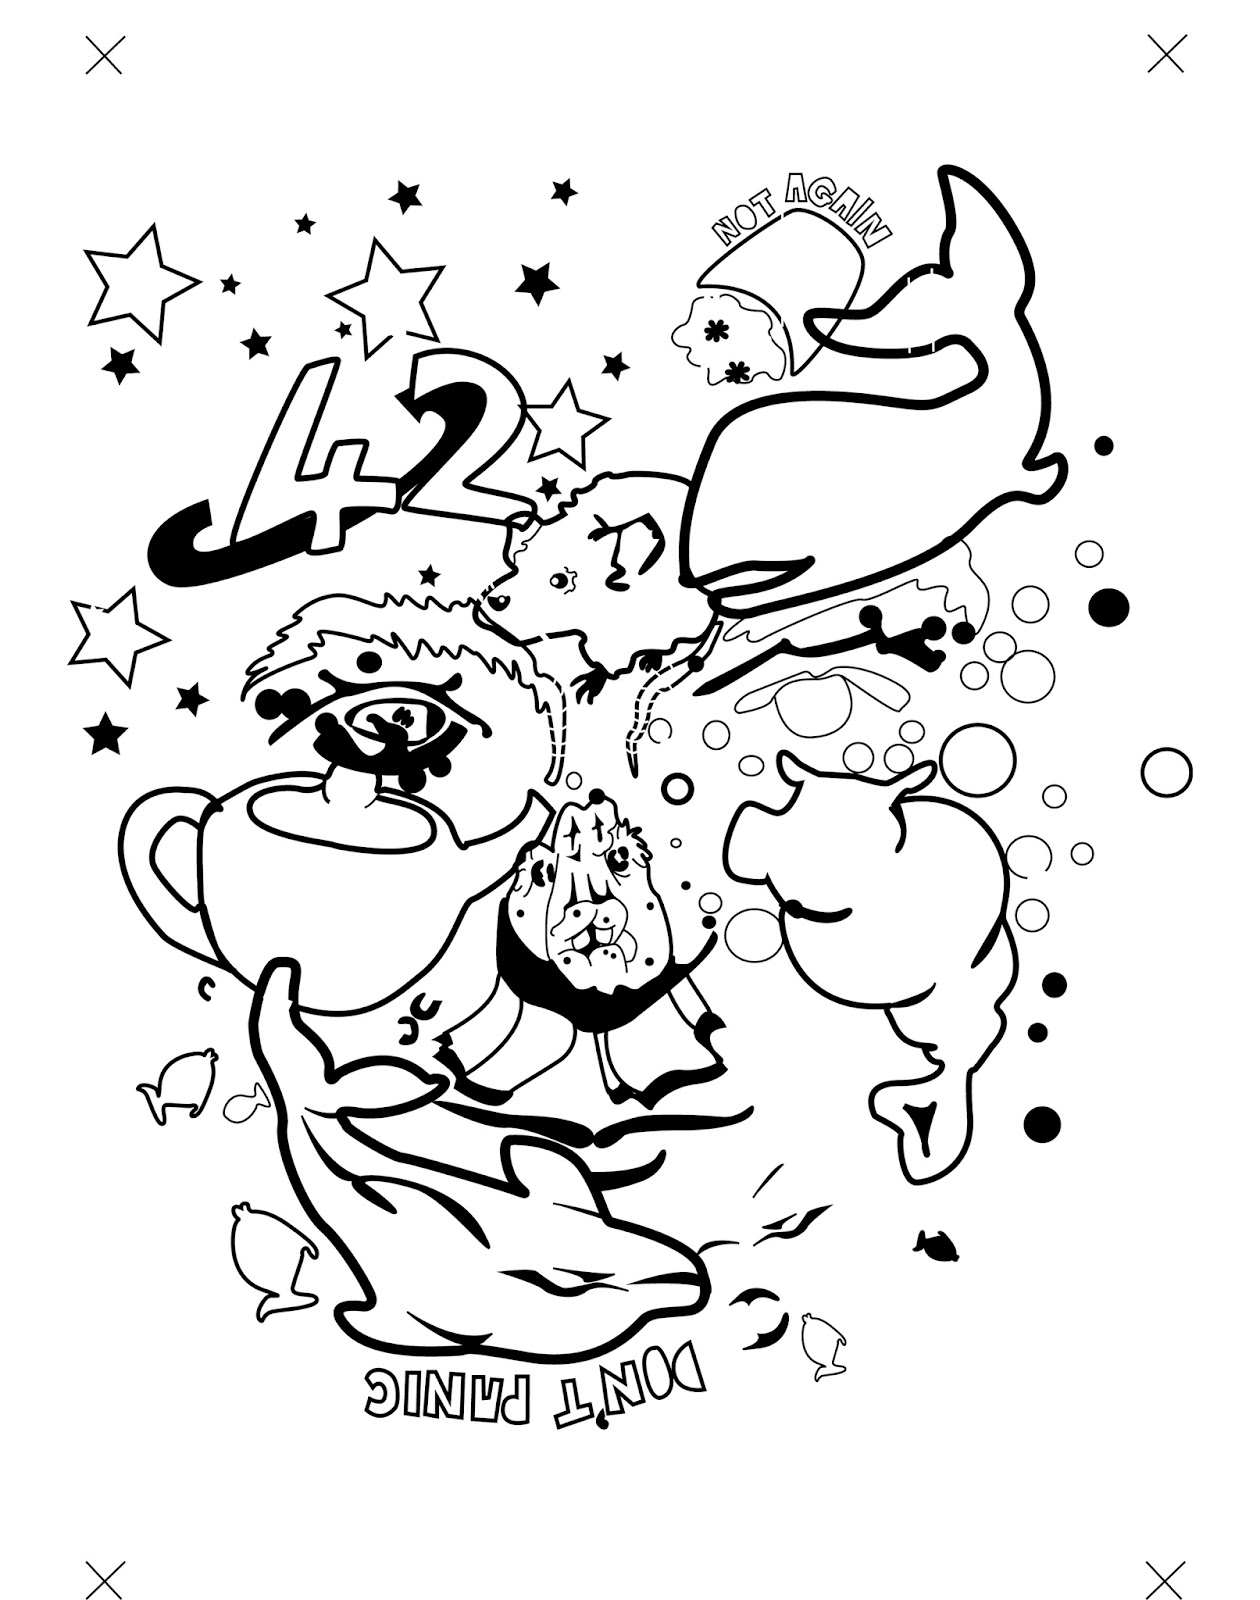
After I had a fair few sketches, I started doing the drawing for my final design! 


I think that I may have rushed this design a little because I really wanted to get it done so I could start vectorising it, so it still looks a bit sketchy compared to my second design. But, I like the elements that I've used to combine together to form the face. I tried to vary in terms of shape and size to make it more interesting as an overall composition. It also makes it a bit more exciting for me, as drawing the same kind of form again and again gets quite tedious. I also tried to have some text in the face to break up between the images to give it more of a balance. Also as my other two designs have a fair bit of text on them, I think they'd work better as a set if the text was equally there. 


After feeling a bit more comfortable with the wacom tablet, I made all of this final design using it. I found it a lot quicker and the shapes came out more fluid. I'll definitely be using it a lot more later on in my work!
I found when I was vectorising my work that my initial design wasn't quite busy enough, so I had to try and repeat elements or add more shapes to it to create more of a face shape. But i'm glad that I noticed this when I was vectorising rather than when I printed it and solved the problem early on. 

Now I've done all three designs I can now get round to screen printing them! I'm really hoping that these go well because I'm actually quite proud of them! I know I will probably have some issues because I've never screen printed without having any help before, but at least I have loads of time so if it does go wrong I don't need to panic. 


Saturday, 21 November 2015

About the Author - Design 2 (part two)

After knowing how to improve the first design, it made it a lot easier when vectorising my second design, for example, saving my work as an illustrator file instead of just a jpeg. But I still had problems.


After a fair few hours of vectorising, I thought it would be a good idea to turn it into the colours I had chosen and place them together to see how successful my screen print would be. I'm so glad I did this because it helped me pick out a fair few floors with this. So I printed it off and scribbled over it.


I just thought that it still needed something. Some areas were too messy or just not neat enough to have as a final print as they look a bit rushed. So I went back onto photoshop and tried again.


I added more detail the second time round and refined the shapes a lot more which really polished it off.  The cream colour I made the background is too yellow, but at least thats just a tester so I know I shouldn't use paper that yellow. Excited to see how this turns out!!!


Thursday, 19 November 2015

About the Author - Design Improvements

After the screen print workshop, I knew that I had to make changes to my first design, so I wrote it down.

What else to put in?
>More writing? - quotes I like from the book/ the most relevant quotes
>Stephen Fry - narrator of the film and audio tape
> Circles worked well, so maybe fill more of the empty space with circles
>Use negative space more
>Have an even balance of colour

So I put my old designs back onto photoshop to see what I could do. Annoyingly though, I had them as jpegs and for some stupid and very annoying reason didn't have illustrator files so I couldn't move any individual layers. GREAT
After staring blankly at the screen for a few minutes, I thought I could just draw on top using one of the photoshop brushes to add to it and use the rubber to create more white areas! It all seems so obvious now! However, I had never used a wacom tablet before, so I was kind of terrified. But, I thought that it was about time that I should, probably being one of the only people on my course who hadn't used one before. So I just went for it


BEFORE


AFTER

I'm happy with the improvements of this design. The purple layer has more going on, the simple outlined shapes now have different thicknesses and patterns running through them, adding an element of wackiness which is very fitting to the author. It just creates a far more pleasing experience for the person looking at the work I think because there's a lot more going on to take in. It also balances out the colours a lot more which I think was one of the main faults in my first design. I really excited to see how this turns out in screen print!!!! 

Thursday, 12 November 2015

About the Author - Screenprint workshop

Screenprint workshop

I was really looking forward to doing this workshop as this determined for me whether I'd be choosing this process for my finals. I've always enjoyed screen printing so I was praying that this would be successful! I also took this workshop as an advantage to test out this design to see if it compositionally works, so I didn't have to come in in my own time to do so - Time saving!!!!
Purple layer

Orange layer 

My positives and negatives 
I scanned in my A2 drawing and put it into Illustrator - tracing it using pen tool. I wanted to vectorise my drawings so the print came out more clean and crisp. I also knew that it would make it easier to create the solid black areas, which is needed to produce a clearer print. I also quite enjoy using Illustrator, so thought it would be silly not to use a process I feel comfortable in. 


Exposed screen


First layer - base colour


Finished Print
I was very happy with how the prints came out, even though most of them were out of alignment, I wasn't expecting them to be perfect as I have only screen printed this way a couple of times. 
Having this test of my design was great, because now I know that I really need to even out the two colour ratio as the orange seems to take over the image. I also think that the use white/negative space works really well as a neutral zone between the two boisterous colours. 

So I've learnt to improve my design I need to -
> Even out the colours - more purple!
>Maybe include more elements? Make it crazy!
> More white space in the elements 


Orignal 


Purple and greeny blue

Red and blue

To open up my choice of colour, I scanned in my print and messed around with the hue on Photoshop. It also saves me a lot of time instead of actually printing them all again in different colours - Time saving!! I think it's quite clear that the orange and purple definitely works the best as a colour combination, as they really compliment each other and makes the image pop! I think it's very pleasing to look at.

Sunday, 8 November 2015

About the Author - Progress crit


I found the progress crit really useful, because it was reassuring for me to go forward with my idea that I am happy with and how I can alter it to make it work best. Now I'm going to do other designs in the same style to try and get a series coming along. I'm also going to simplify my first design so I can do a test A4 screen print on Tuesday to see if it will work which I'm looking forward to a lot! I really hope it works!

I still have to think about my animation too which I know I'm kind of shunting away at the moment.. But this crit also reassured me that it can be as simple as the elements of the face pulsating or moving around. I definitely know that I want my animation to link with my prints so you can easily tell that they're made by the same person. 

About the Author - Print workshop - Monoprint & Linoprint

I hadn't done monoprinting since last year and not really done lino printing properly, so I was quite excited for the workshop. I also love printing, so I knew that I would enjoy it.


MONOPRINT

I thought that mono-printing was okay, I don't really like how you just never know how the print is going to turn out. I'm also not a massive fan of abstract artwork, I like producing work that shows a high level of craftsmanship. Although not saying that monoprint is a cop out and that it's easy, I just prefer work that you can tell someone spent hours over. 

But I liked the experimentation and being able to create loads of textures and images fairly quickly. I can use these in maybe my animation or some aspect of my work. They worked really nicely as backgrounds for my lino prints which I realised shortly after..


LINOPRINT 

I really liked doing lino printing, as cutting the image into the lino reminds me of paper cutting which I really like. As I said before, I enjoy doing processes that take a lot of time over doing, which I think is why I also have fun with this. Although, I still think that with the design that I'm looking at, screen printing would be more suitable. But we'll see after the screen printing workshop to see how successful it will be. 

About the Author OUIL504 - resolved problems

I came to a bit of a mind block and wasn't really sure of what I was doing and where I really wanted to go. But mainly just wanting to know if what I was doing was actually any good. I didn't want to carry on aimlessly just for the sake of generating work but for it to not be very relevant and just a waste of time. 

But after talking to Teresa, she told me to look at the artist Arcimboldo. This helped me a lot, because I think my concept wasn't bad, but I needed to try and work more with the objects to mould into facial structures to make it obvious that it is a face. Also by working bigger (A2?) this will make it clearer.


So I went out of my comfort zone and took home some A2 paper.

IMAGES 

I made the author's face first just using shapes to see what direction and size that works best to create a facial structure. This helped a lot, as it turned into a guide for my first proper design. 


I'm really happy with how this turned out. I think it's visually quite exciting, as there's loads of different elements to look at and it's clear what author I have chosen. But I want to see if I can try and make the elements mould more into the facial shape. And also because I want to turn it into a screen print, I'm going to have to think about how to simplify it down and not over complicate with line work.